| |
|
| |
|
AMBM - The Analog Meter Bridge Module Project
(Modules as kits for DIY multichannel analog PPM or VU meter bridges
With LED bars containing 51 dual-color LEDs such a meter bridge is not only technically valuable but an exceptional eye-catcher, too
Watch (after a short introduction) the AMBM in action:
Higher resolutions than the video above (768 x 432, 25p, 164 MB, 2.5 Mbit/s) are available, but my hoster does not necessarily guarantee the necessary download speed so that you either should download it completely or wait a while before you start viewing:
→ Medium resolution, (1280 x 720, 25p, 727 MB, 12 Mbit/s): The download is often fast enough
→ High resolution, (1920 x 1024, 50p, 1570 MB, 26 Mbit/s): The download is normally not fast enough
The AMBM modules are meant to be kits, so you are not only free to install them in various ways - the drawback is that you also need to decide how to do it and to care for the necessary mechanical design and parts.
The kit contains:
That's it. No screws, no nuts and bolts, nothing else. Thus you have to care yourself for all these screws, nuts and spacer bolts, i.e., all mechanical parts.
And you must care for a power supply unit, e.g., 12 V, at least 350 mA per AMBM module set (2 channels).
Should you want to install the LED modules further away from the controller than the 45 mm IDC ribbon cables allow, let me know. I can alternatively supply the IDC ribbon connectors and sufficient cable separately.
The kits come with the SMDs solderered and tested, but you must solder the few THDs (through-hole-devices) yourself. This allows you to assemble and wire them differently from my original intention and the description here.
The modules as they come as kits... |
... and assembled with screw type terminals, pin headers and LED bars |
|||||
The Control Module AMBM-Ctl |
||||||
Two LED Modules AMBM-LED |
||||||
The AMBM's scale is identical for both VU and PPM. It reaches from -50 dB to +5.5 dB. 0 dB scale indication refers to either +4 dBu or -10 dBV (others are possible), which I think is widely used in non-broadcast studios. Levels above 0 dB are displayed with red LEDs, levels between -5 dB and 0 dB either yellow or green and all other LEDs below are green. The scale values are:
When LED No. is lighting... | ... the signal level is greater than [dB] | |||
51 | 5.5 | |||
50 | 5 | |||
49 | 4.5 | |||
48 | 4 | |||
47 | 3.5 | |||
46 | 3 | |||
45 | 2.5 | |||
44 | 2 | |||
43 | 1.5 | |||
42 | 1 | |||
41 | .5 | |||
40 | 0 | |||
39 | -.5 | |||
38 | -1 | |||
37 | -1.5 | |||
36 | -2 | |||
35 | -2.5 | |||
34 | -3 | |||
33 | -3.5 | |||
32 | -4 | |||
31 | -4.5 | |||
30 | -5 | |||
29 | -5.5 | |||
28 | -6 | |||
27 | -6.5 | |||
26 | -7 | |||
25 | -7.5 | |||
24 | -8 | |||
23 | -8.5 | |||
22 | -9 | |||
21 | -9.5 | |||
20 | -10 | |||
19 | -11 | |||
18 | -12 | |||
17 | -13 | |||
16 | -14 | |||
15 | -15 | |||
14 | -16 | |||
13 | -17 | |||
12 | -18 | |||
11 | -19 | |||
10 | -20 | |||
9 | -23.33 | |||
8 | -26.67 | |||
7 | -30 | |||
6 | -33.33 | |||
5 | -36.67 | |||
4 | -40 | |||
3 | -43.33 | |||
2 | -46.67 | |||
1 | -50 |
Maybe similar to this:
Anyway, yet to come...

Selection between +4 dBu and -10 dBV for 0 dB display is made by 4 solder joints (solder jumpers) on the solder side of the AMBM-Ctl.
Should you need another reference level for 0 dB display than +4 dBu or -10 dBV you can achieve it with 2 external resistors for each channel at its input pins, provided the reference level is higher than -10 dBV (= 316.2 mVRMS), read more below.
The settings in detail are:
PPM and VU measurements differ a lot from each other.
The PPM mode is selected as default, i.e., when switch 1 is off.
![]() Bar display
Bar display
![]() Dot display (dot color = yellow)
Dot display (dot color = yellow)
![]() Bar display with peak hold
Bar display with peak hold
(This is the default display, i.e, when all switches are off resp. when there are no switches)
![]() Dot display with dot color = background color
Dot display with dot color = background color
![]() Background LEDs off
Background LEDs off
![]() Color pattern green-red
Color pattern green-red
![]() Display dimmed
Display dimmed
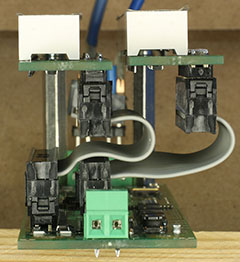
The LED modules can be mounted stacked on the control module using spacer bolts with a length of at least 30 mm, as shown on the photos here. When both LED bars are mounted this way, a pitch of either 21.59 mm (0.85") or 27.305 mm (1.075") is possible.
When the LED modules are mounted separately from the control module, a minimum pitch of 17.4 mm (0.675"), the width of the LED PCB, is possible. The LED module's PCB can be shortened by cutting or breaking it at the provided perforation.
The mounting holes are prepared for M3 (approx. #4-40 UNC) screws.
 Should you want a huge distance between control and LED modules, you can also use very long ribbon cables. Up to 1 m is no problem. I provide ribbon cables with a length of 45 mm, intended for stack mounting of the module, as shown on the close-up view on the right.
The LED bars' protective foils are meant to be removed before they are finally built in. They are usually invisible but can produce reflections while the LED bars' surface itself is matt. Anyway, on all photos here you can still see the foils and, when you take a close look, reflections produced by them, too.
Correct wiring is crucial.
 Display option switch:
 There is no ground pin on the 6 pin header, that is important: A ground connection between the control modules would cause strong AC-containing equalization currents between the modules which again adds strong noise on the measured signals. Thus the switches' common ground must be connected at the power supply's ground by a separate wire.
As mentioned above, when you need another reference level for 0 dB display than +4 dBu or -10 dBV you can achieve it with 2 external resistors for each channel at its input pins, provided the reference level is higher than -10 dBV (= 316.2 mVRMS). Connect these resistors in series with the AMBM's analog inputs. Each input wire requires one resistor. The values for these resistors can be calculated from:
R = (USource - UInput) × 42 kΩ/V
Example:
Tip: 13.3 kΩ is not a common value from the E24 series (but it is at least a value from the E48 series). To make it easier to use available resistor values, you can also use two unequal resistors per input. The following applies:
- For a precise setting of the reference level, the sum of the two resistor values must be correct, i.e. in the example 2 x 13.3 kΩ = 26.6 kΩ.
- For optimum common mode rejection, both resistor values must be identical.
This means that if no great demands on the common mode rejection in the system are required, it may be easier to achieve the reference level with two different resistors. In the example, for example, 12 kΩ + 15 kΩ = 27 kΩ, which is close to the desired 26.6 kΩ. Even with only one 27 kΩ resistor, only the common mode rejection would be further reduced.
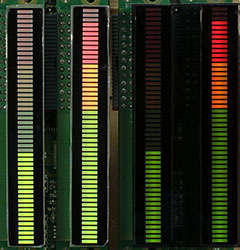
 I recommend to use a gray filter glass in front of the LEDs. That makes the display darker, but it enhances the contrast in illuminated environments significantly. With the photo on the right I tried to illustrate that, but it does not really show the effect in practice.
You can buy well suitable acrylic display windows from TTV GmbH, even in customized sizes. A gray color with a transparency of 30% is a good compromise. A scratch resistant and non glare surface is favorable. Such a material is ANTIFLEX-AR, which is usually in stock as ANTIFLEX-AR 1220 with thicknesses of 1.5, 2 and 3 mm.
The AMBM can be supplied with 7 to 15 V. The typical maximum average and peak supply currents are:
Supply voltage |
Maximum average current (all LEDs on) |
Maximum peak current (independent of LEDs) |
||
7 V |
400 mA |
500 mA |
||
12 V |
250 mA |
320 mA |
||
15 V |
200 mA |
250 mA |
(Note: On the workbench, 5 V is possible, too, but with very little or no headroom for cable losses and tolerances.)
Due to the multiplexed LEDs there is a strong ripple on the supply current with peaks up to 25% more then the maximum average current listed above, even when not all LEDs are on. This is also why the AMBMs' grounds must not be connected to each other anywhere else but at their power supply inputs, preferably at the PSU.
For this project, which was started some time ago, I now have the module sets in stock.
| One kit | 129.- € |
|
| Each additional kit* | 109.- € |
|
| Shipment Germany (DHL Paket) | 9.- € |
|
| Shipment other countries** | 16.- € |
* A kit is regarded to be additional even when you order it somewhen later.
** Refer to How to order for details and excluded countries.
Let me know if you want single parts instead of 45 mm pre-fabricated IDC ribbon cables. And feel free to mail me for other questions.
| Last update: April 30th, 2024 | Questions? Suggestions? Mail Me! | Uwe Beis |